


How to build a learning pallet that your child can use for years
Sponsored by Byggmax
Your child wants to get up on their own. To the sink, the kitchen counter or to reach their favorite book. A playpen gives your child independence - and you less lifting in everyday life. The best part? You can build one yourself, even if you've never done any carpentry before. Here's a simple guide with few tools, clear steps and materials that won't break the parental leave budget. This is a project you can actually finish.
Why a curriculum makes everyday life easier
A curriculum is not about perfect angles or being “handy”. It is about creating independence in everyday life - for both child and parent.
For your child:
- Can get up by yourself and be involved
- Training balance and motor skills
- Growing in the sense of “I can do it myself”
For you:
- Less carrying and lifting
- A project that feels doable
- The feeling of having actually built something that is used every day
You don't need to be a carpenter - just start
This is a perfect project for those who want to get started. No advanced solutions and no special tools. Everything is available at Byggmax, and you may already have many things at home. The important thing is not that it's perfect, but that it supports you and your child in everyday life!
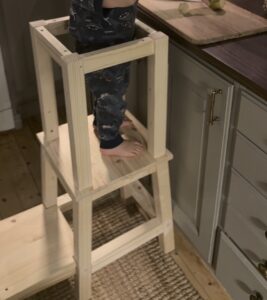
A stable two-level learning pallet - designed for young children who want to do more on their own.
What you need (simple & affordable)
Material:
- x5 Rule 45x45mm
- x3 Outer panel 22×45
- x1 Shelf in Pine 1000x4000x18 mm
Total price: 348 kr at Byggmax
Verktyg:
- Screwdrivers
- Saw (handsaw or jigsaw)
- Tumstock
- pencil
💡Tips: Ask the staff at Byggmax to cut the boards directly in the store. It saves both time and energy - especially with children at home.
7 steps to a finished pallet!
Video visualizing each step can be found at the top of the article
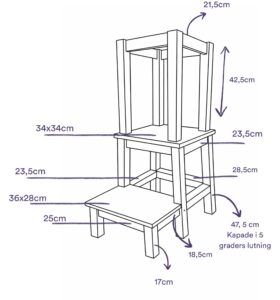
1. cut the material
Start by cutting all the timber according to the plan. Once everything is prepared, the construction flows
2. attach the legs to the standing plate
Position the legs correctly and first fix them temporarily with a smaller screw. Then turn the structure upside down and screw the legs firmly in place from above with a larger screw.
3. install the crossbars
Put the crossbars between the legs, about 10 cm up from the floor. Secure each piece with one screw from the side and one diagonally from below for extra stability.
4. Assemble the step
Screw the step from below so that the screws are not visible. Screw the legs to the step from the top down into the legs. Countersink the screws so they can be hidden with a wooden plug.
5. Assemble the frame pieces
Fix the frame pieces under the tread plate and under the step. Use two screws screwed into the legs for a solid construction.
6. Attach the coaming at the top
Assemble the coaming by attaching the joists from below and screwing the pieces that sit between them.
7. sanding and painting
Carefully sand all edges and corners to make the pallet safe and comfortable to use.
Feel free to paint the stool in Midun paint color and break it into a color that suits your home.
Well done! You've built something that makes a real difference to everyday life - stable, secure and made with care. It doesn't have to be perfect to be really good.


